STANDALONE GALAXY IN IFB CLOUD
1. Spin off a virtual Machine bare-galaxy with the  core-IFB cloud
-
Connect to your the biosphere, and click on RAINBio menu.
-
Choose the
 virtual image.
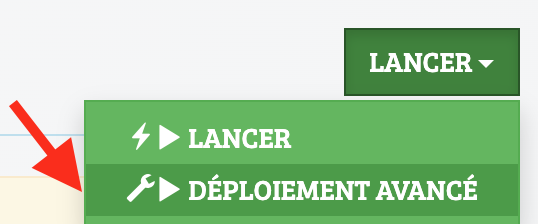
 - Choose "Déploiement Avancé" in the menu "Lancer"
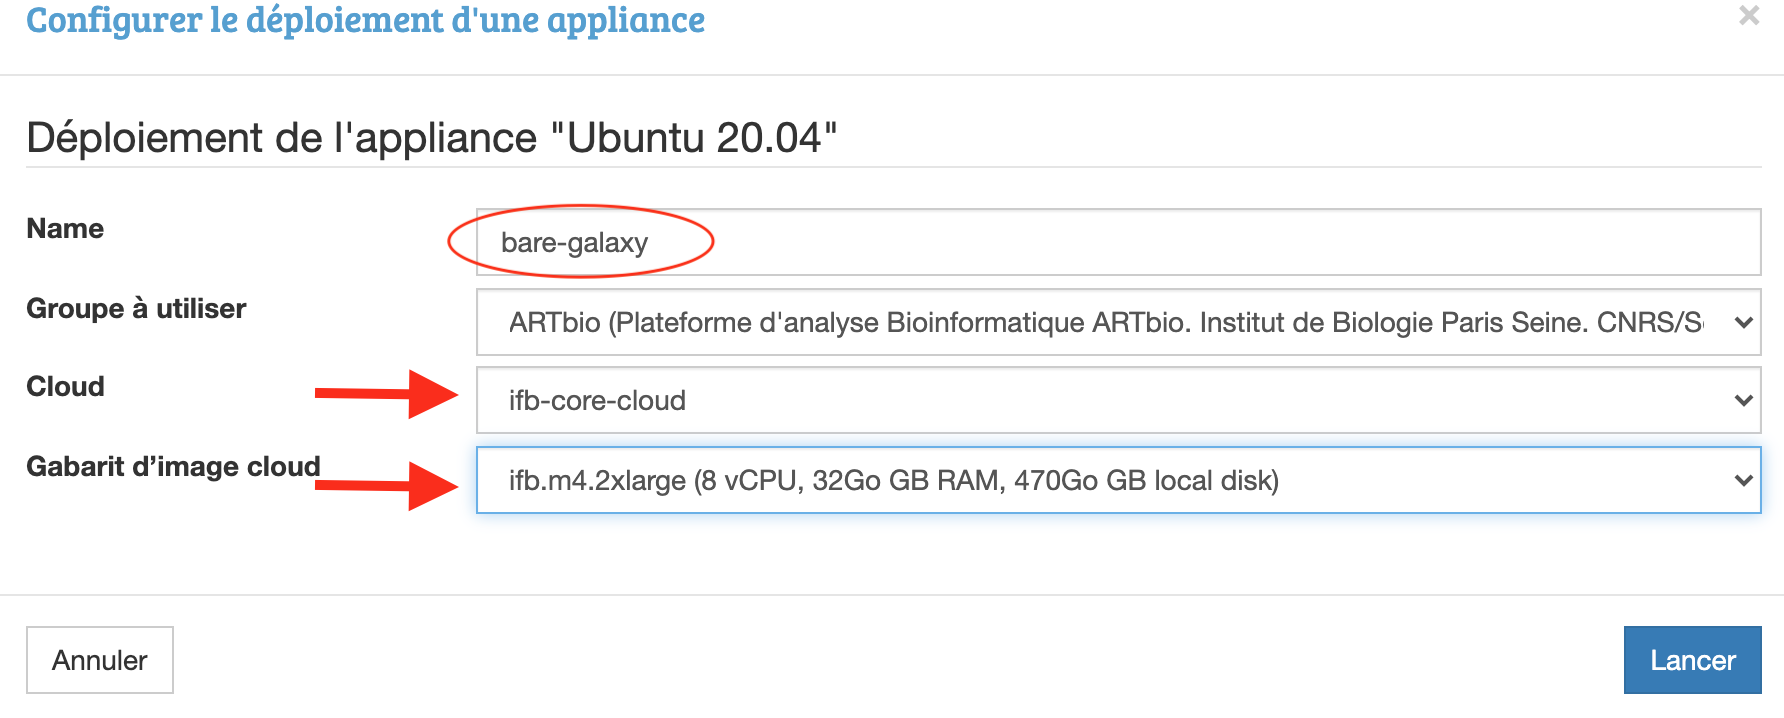
- Give a name to your VM, choose
IFB-coreas a cloud region,ifb.m4.2xlarge (8 vcpu, 32Go GB RAM, 470Go GB local disk)for the machine, and pressLancer.
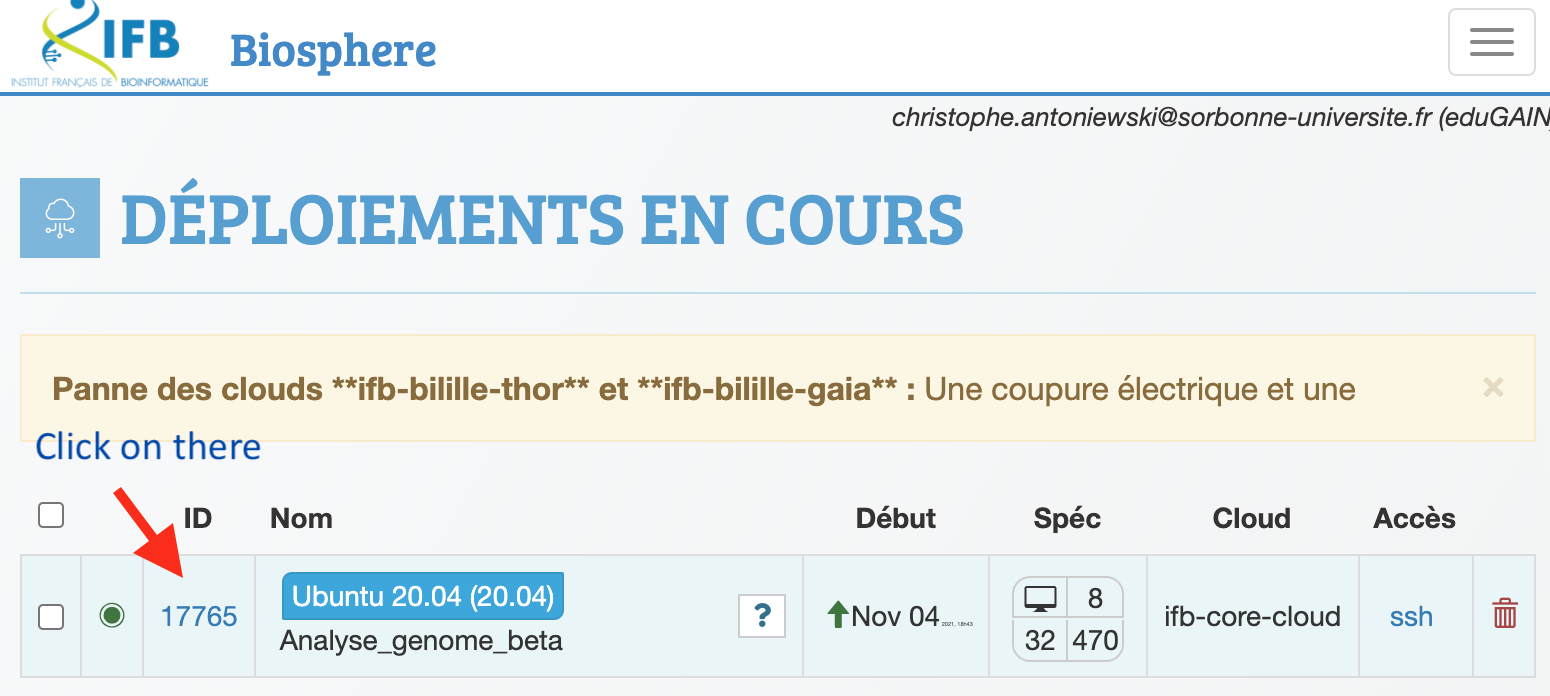
- Follow the deployment of your VM in the
myVMmenu. In contrast to the Google Cloud platform, this may take more that 10 min.
2. SSH connect to the IFB VM using your terminal
- Be sure that your
privatekey (mykey) is in your ~/.ssh/folder. - The corresponding
publickey (mykey.pub) should have been deposited/uploaded to biosphere, otherwise, it cannot work. - Type the following command
- If this command does not work (it happens...), type instead:
- You should see a shell in your connected VM, which looks like:
Terminal
imac-chris:~ aligre$ ssh -A ubuntu@134.158.247.168
The authenticity of host '134.158.247.168 (134.158.247.168)' can't be established.
ECDSA key fingerprint is SHA256:WdN9NuYfDgj0DM0r78fH5rUkSwuQK3IIH+H4FmkGpOM.
Are you sure you want to continue connecting (yes/no/[fingerprint])? yes
Warning: Permanently added '134.158.247.168' (ECDSA) to the list of known hosts.
Welcome to Ubuntu 20.04.3 LTS (GNU/Linux 5.4.0-88-generic x86_64)

 * Documentation:  https://help.ubuntu.com
 * Management:     https://landscape.canonical.com
 * Support:        https://ubuntu.com/advantage

  System information as of Mon Nov  8 18:29:33 UTC 2021

  System load:  0.07               Processes:                153
  Usage of /:   17.0% of 19.21GB   Users logged in:          0
  Memory usage: 3%                 IPv4 address for docker0: 172.17.0.1
  Swap usage:   0%                 IPv4 address for ens3:    10.158.16.9

0 updates can be applied immediately.


*** System restart required ***

The programs included with the Ubuntu system are free software;
the exact distribution terms for each program are described in the
individual files in /usr/share/doc/*/copyright.

Ubuntu comes with ABSOLUTELY NO WARRANTY, to the extent permitted by
applicable law.
3. Installation of the Galaxy server
In this first approach "bare-galaxy", everything is made super simple:
-
We are gonna become
rootunix user. This is easier because installation of new programs as well as manipulations of network interfaces is generally permitted only to users with administration rights. -
We are gonna check that all software needed to deploy galaxy are there (they are with Ubuntu 20.04 !)
-
Finally, we will run the automated deployment of Galaxy
So let's do this, step by step:
1.
This command open a new "shell" where you are root. You can check this by typingpwd that
should return /root/, meaning that you are now working in the directory of the root user.
2.
This command checks that the only 2 programs required for the deployment are already there3.
This command says to usegit to clone the code repository located at
https://github.com/galaxyproject/galaxy.git.
In addition the -b release_21.05 option specifies that only the version release_21.05
will be cloned locally in your virtual machine. You may try to visualize the URL
https://github.com/galaxyproject/galaxy.git
in your web browser. You will, literally, see the code of Galaxy. It is Open Source, as
you can notice.
4.
This command shift you in thegalaxy directory that was created by git and the
git clone command in 3.
5.
This command makes a copie of thegalaxy.yml.sample file to galaxy.yml - in the
directory config that is in the galaxy directory.
6.
Using this command, we are going to edit some important settings that are required to run our Galaxy fresh instance.- Find the line (you can use the editor command Ctrl+W, paste the previous line and press enter)
and edit it to
By doing this, we ensure that we will be able to reach the galaxy web server on our virtual machine using the usual web port80.
- Find the line
delete the
#character and type your email address between the two single quotes.
Any email address is ok (admin@galaxy.org for instance). It is just used here as an admin identifier.
- save your changes by pressing the key combination Ctrl+O
- quit nano by pressing the key combination Ctrl+X
OPTIONAL but SAVING US 20 min of deployment !
Before starting the deployment of Galaxy, we are going to use a little trick to bypass the step of compilation of html and javascript codes which are used to render the Galaxy graphic interface.
Indeed, modern web application use a lot of cached codes that speed up the user experience. However, this implies that this code cache is built during the deployment of the application.
For Galaxy, building/caching the client codes for the web server takes about 20 min and this is increasing with newer galaxy versions.
To save us these 20 min, we are going to remove the web client folders and replace them by already built client folders, prepared by your trainer...
- Remove the web client folders
- Download the cached web client folders
- Uncompress the cached client folders
Last note: this tip is optional, if you run the next command without doing it,
everything will go the same, but the run.sh script which we are goin to execute will
detect that the galaxy web page are not built and it will do it. This takes about 10-15
minutes...
One more thing specifically related to the IFB VMs
In IFB cloud, VM instances have a very small system volume, and we have installed the galaxy git repository on this volume. You can check this using the command
Since the deployment of Galaxy will increase the size of the galaxy folder, it is safer to move this folder on a larger volume that is mounted at /mnt To do so, just type:7. Ready for deploying Galaxy ?
Then type sh run.sh and press the enter key !
You should see an abundant log scrolling down. Don't worry !
- All Galaxy dependencies required for the Galaxy server instance are being downloaded and installed
- The Galaxy computing environment is automatically set up
- the Galaxy web server is installed and static pages are built (this step specifically takes more and more time)
- The Galaxy database (sqlight) is automatically upgraded to its latest structure/model
- The package manager Conda, which is heavily used by Galaxy to install its tools is installed.
After 5-10 minutes, you should see the log stopping with:
4. Connect to your living Galaxy instance
All virtual machines deployed in the IFB core are located in a subnetwork whose access is limited to
- the port 22, for ssh connections
- the port 443, for https (web) connections. Accessing a web server running on a virtual
instance through https (443) requires that each machine has declared its own SSL
certificate and most preferably owns a unique domain name, in the form of
mymachine.ifb.fr. Although there are turnarounds for generating self-signed SSL certificate for cloud instances, this implies manipulations which are beyond the scope on this training for beginners.
Unfortunately, the port 80 is blocked by the IFB firewall, precluding connection through the "insecure" http port your web Galaxy server is listening to.
There is a least 2 ways for circumventing this limitation and "tunnelling" http requests from your local browser through the open secured ssh port 22.
1 - option 1. Running a SOCKS proxy on your VM
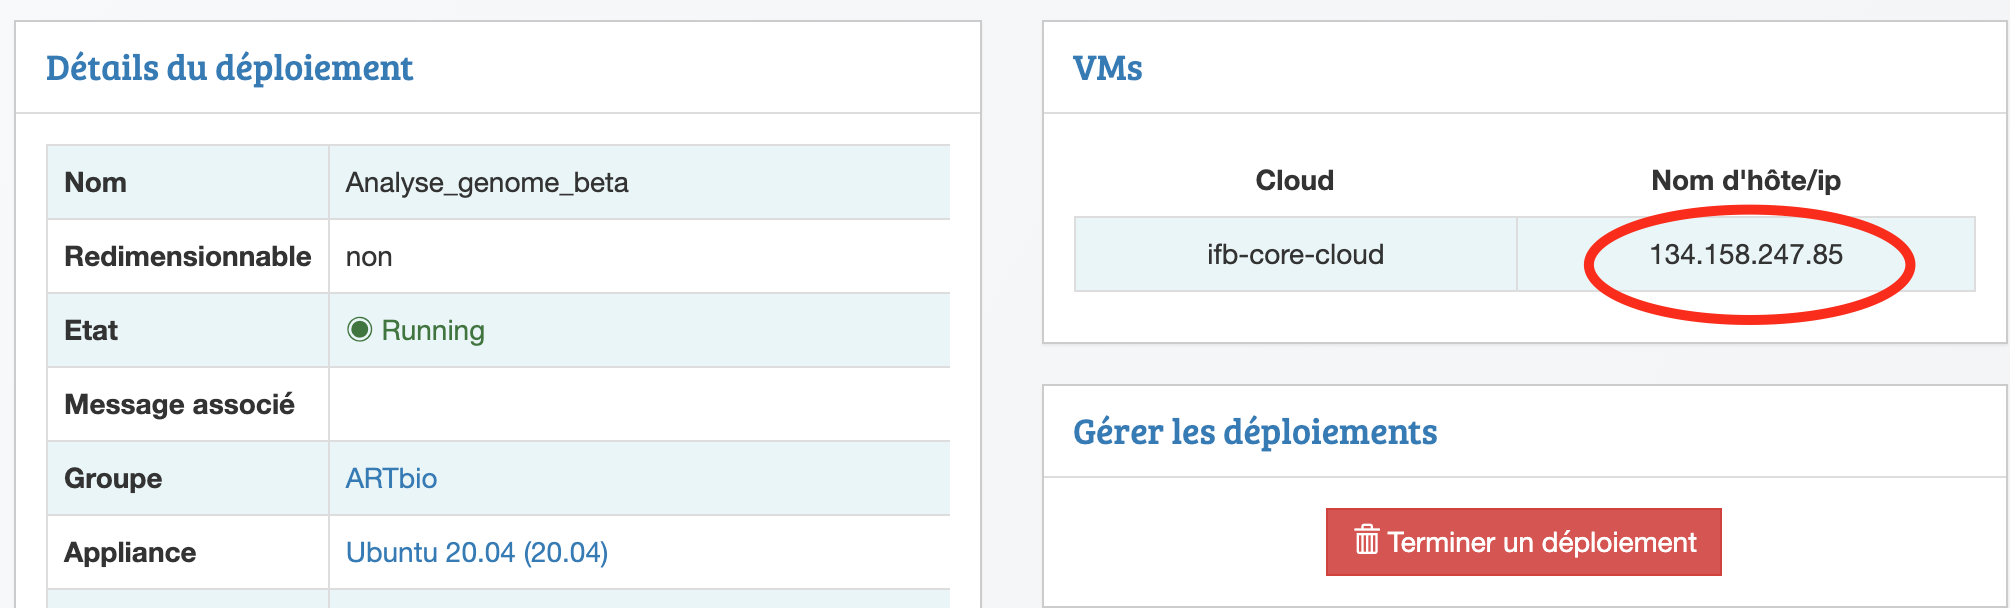
First of all, get the IP address of your VM from the IFB biosphere interface
Now, in a terminal  session, type this command:
ssh -A -D 9900 ubuntu@134.158.247.85 # replace the IP address with your IP which you will find in you IFB control board
If you receive an error from the previous command, it is most likely the option -A which failed. Then, try the following command instead:
ssh -i .ssh/<your_ifb_private_ssh_key> -D 9900 ubuntu@134.158.247.85 # replace the IP address with your IP

<your_ifb_private_ssh_key> is a file located in the ~/.ssh folder, which you
should have generated at your IFB cloud registration
this is not the corresponding public key which has the extension .pub
(your_ifb_private_ssh_key.pub)
It is important that you leave this terminal session alive.
THEN
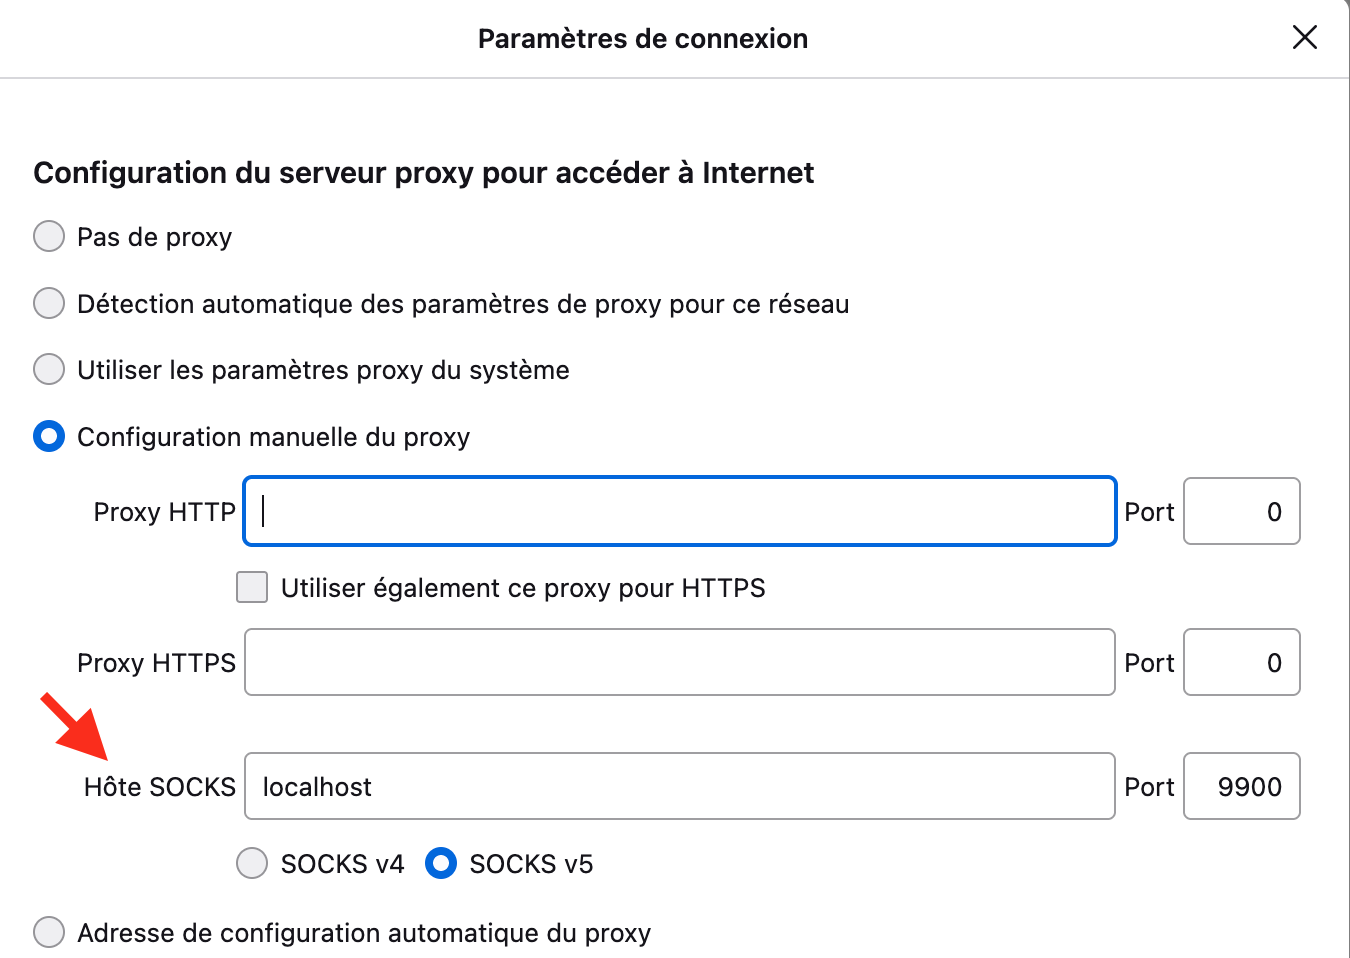
- open your system network settings
- go to your system proxy settings
- Check the box for SOCKS Proxy (v4 or v5)
- in the field for the Server Proxy SOCKS address, enter
localhost - in the field for the Server Proxy SOCKS port, enter
9900
you can also set your socks proxy settings directly in Firefox (but not in Chrome)
Go to about:preferences#general in Firefox and click "Parameters at the very bottom of the page":
From this point
You should be able to access directly to your cloud Galaxy server by typing
http://<IFB.IP.your.server>
1 - option 2. Tunnelling the unaccessible port 80 through an accessible ssh (22) port
Using this method, no need to set network parameters for your system or in your browser.
Type the following command in a terminal window, and leave it alive:
sudo ssh -A -N -L 80:<your.ifb.cloud.ip>:80 ubuntu@<your.ifb.cloud.ip> # replace <your.ifb.cloud.ip> by a real ip address
OR, if the previous command returned an error
sudo ssh -i .ssh/<your_ifb_private_ssh_key> -N -L 80:<your.ifb.cloud.ip>:80 ubuntu@<your.ifb.cloud.ip> # replace <your.ifb.cloud.ip> by a real ip address
<your_ifb_private_ssh_key> is a file located in the ~/.ssh folder, which you
should have generated at your IFB cloud registration, this is not the corresponding public
key which has the extension .pub (your_ifb_private_ssh_key.pub)
THEN
Access your cloud Galaxy server by typing in your browser http://localhost:80
Note that this address is different from the one used when setting a SOCKS proxy.
2. Register as an admin to your Galaxy server instance
- In the new browser window, follow the menu
Authentification et enregistrement→Enregistrementand register to your instance using the email address you put in the galaxy.yml at step 3.6 -
After login, you should see the admin tab in the top menu of the Galaxy interface.
You are connected to Galaxy as an admin !